Embark on your journey through the vast universe of *Honkai: Star Rail* and find yourself in the mesmerizing "Eternal Holy City" Okhema, the first map you unlock upon arriving at Amphoreus. This enchanting location is split into two key areas: Kephale Plaza and Marmoreal Palace, each brimming with secrets and treasures waiting to be discovered.
Your adventure in Okhema begins after a tumultuous arrival on a new planet following Black Swan's advice in Penacony. A sudden attack on the train coach thrusts you into an unknown area, but fear not—Phainon comes to your aid, guiding you to Okhema and introducing you to pivotal figures in Amphoreus.
Eternal Holy City Okhema Treasure Locations in Honkai: Star Rail
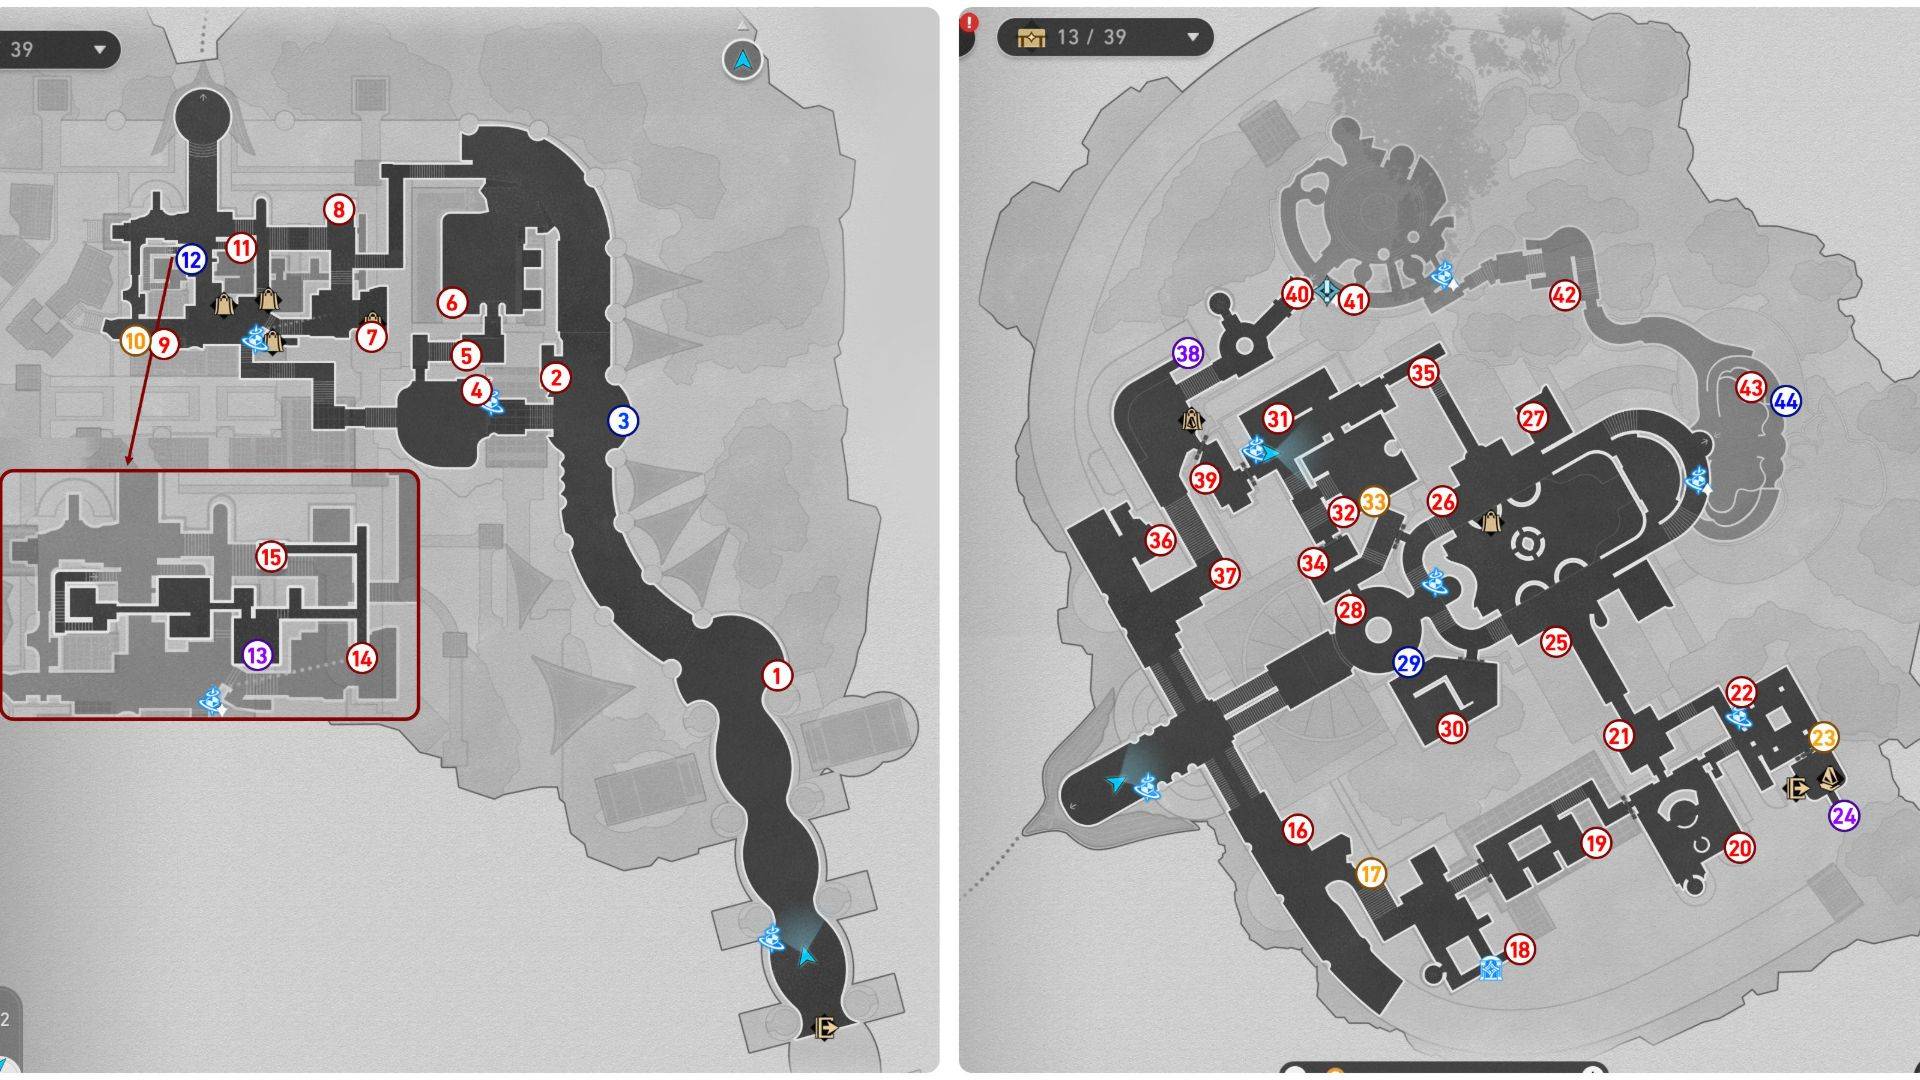
In Okhema, there are 33 Treasure Chests, 4 Flying Spears, 3 Spirithiefs, and 4 Golden Scapegoats to uncover. To maximize your treasure hunting efficiency, consider bringing 'The Herta' along, as her Technique will highlight several unclaimed treasure chests on the map. Topaz is another excellent choice; her companion Numby will alert you when a chest is nearby, guiding you straight to your reward.
The map uses different colors to denote specific types of items: blue for Golden Short Spears, purple for Spirithiefs, and yellow for Golden Scapegoats.
- 1. Begin at the Path of Parting Space Anchor, head north to the open area, and look east to find your first treasure chest.
- 2. Continue along the path to Kephale Plaza. As you see the Space Anchor, walk past it and look east to discover a treasure chest near the rest area.
- 3. From your current spot, look southeast to find a breakable shield with a spear inside it. Rewind time to follow the Golden Short Spear until it reveals a treasure chest.
- 4. Teleport to the Kephale Plaza Space Anchor to find a treasure chest right beside it.
- 5. Head north through the hallway to find a Basic Treasure near some crates.
- 6. Keep following the hallway to the plaza, and look west to find a treasure chest next to a dinosaur.
- 7. Use the Marmoreal Market Space Anchor and head east to find a treasure chest inside Chartonus Smithy, the blacksmith shop.
- 8. Continue north to locate a Basic Treasure at the road's end.
- 9. Return to the Marmoreal Market Space Anchor and head far west to two breakable shields. Break them to uncover a treasure chest.
- 10. Adjacent to the previous chest, you'll find the new Golden Scapegoat puzzle. Solve it by guiding the gold goat to light up the altar and unlock the chest.
- 11. Head back to the market center and go north to find two small steps on the sides. Climb the right steps for a Basic Treasure.
- 12. Descend the stairs and move to the opposite side to find a breakable shield with a spear. Break it, fix the Golden Short Spear, and follow it to the second floor.
- 13. The spear should stop near the ritual fountain. From there, head east onto the rooftops. Follow the path until you spot a treasure chest at the edge. Upon claiming it, a Spirithief will appear and steal it. Use Oronyx’s power to rewind the fissures and reclaim your treasure.
- 14. The next chest is at the road's end to the south.
- 15. After grabbing the previous chest, head northwest for the last treasure chest on the rooftops.
- 16. Use the Marmoreal Palace Space Anchor and head southeast to the Dromas Stop beside the road. The treasure chest is behind a breakable shield.
- 17. Go to the eastern stairs to find a Golden Scapegoat puzzle. Solve it to unlock another Basic Treasure chest.
- 18. Follow the road upward to the small bathing area. The chest is at the corner near a lounge chair.
- 19. Walk northeast to a room filled with scrolls. The treasure chest is near the last cabinet.
- 20. Continue northeast to another bathing area. The treasure chest is beside the long table.
- 21. Look at the door leading north to find a Basic Treasure inside a room with a bard and listeners.
- 22. Warp to the Hall of Respite Space Anchor and turn around to find a treasure chest right beside it.
- 23. Walk to the opposite side of the room and solve the Golden Scapegoat puzzle to unlock the treasure.
- 24. Enter the private chamber beside the previous puzzle and go to the end of the balcony to find a Spirithief’s treasure chest.
- 25. Head to the Overflowing Bath Space Anchor, walk to the south part of the bathroom, and retrieve the treasure chest submerged in water.
- 26. Go to the opposite side of the room to find another chest in the water.
- 27. From the previous spot, walk northeast to the swimming pool with a Dromas. The treasure chest is in the water beside the animal.
- 28. Return to the Overflowing Bath Space Anchor, walk through the waterfall to the reception area, and find a treasure chest beside a chair.
- 29. Walk to the opposite side of the room, destroy the breakable shield, fix the Golden Short Spear, and follow it to a chest.
- 30. While following the flying spear, enter the back room to find a treasure chest on top of a box. Don't miss it before resuming your pursuit of the spear.
- 31. Use the Court of Seasons Space Anchor and spot a treasure chest near the wall.
- 32. Head to the massage room in the south to find a Basic Treasure near the beds.
- 33. In the same room, solve the Golden Scapegoat puzzle to unlock a hidden treasure.
- 34. Leave the massage room and head south to find a treasure chest in the storage room.
- 35. Return to the Court of Seasons Space Anchor and head northeast to the corridor for another treasure chest.
- 36. Now, go to the Marmoreal Palace Space Anchor and head north to the crate storage area. The treasure chest is near a dinosaur.
- 37. Continue upward to find the next treasure chest near a group of NPCs.
- 38. Follow the path to a banquet and walk to the left side of the stairs. The treasure chest is beside a cushion on top of the partition.
- 39. From your previous spot, enter the room to the south and retrieve the treasure chest behind a breakable shield.
- 40. Leave the room and head to the elevator on the north, but don't use it yet. Instead, go to the back of the elevator for another hidden treasure chest.
- 41. Take the elevator to the second floor and head east to the Basic Treasure near the Flying Amphora in front of a cabinet.
- 42. Continue along the path to the Garden of Life Space Anchor and head east to a small private room to find another treasure chest.
- 43. Teleport to the Hero’s Bath Space Anchor and head to the northern pool to find a treasure chest submerged in water.
- 44. Finally, use the swirling pillar to climb upward and find a breakable shield with a flying spear. Fix the Golden Short Spear and follow it to unlock the last treasure chest in Okhema.
Collecting these treasure chests is a fantastic way to gather Stellar Jades in *Honkai: Star Rail*. With the introduction of the new area in version 3.0, diligent Trailblazers stand to amass a significant amount of Jades by uncovering all the chests and solving the puzzles scattered throughout Amphoreus.

 Latest Downloads
 Downlaod



 Top News